
I’ve been MIA for quite awhile. I’m so sorry. I know you feel deprived and neglected. Mostly deprived so I’m here to blow your minds After a stress-filled holiday and being sick for 2 weeks all I wanted to do was be a lazy bum. But now that I’m healthy again it’s time I rehash one of my favorite creations from the 2013 holiday season. And I can totally do that because my holiday decorations are still up. Can’t get rid of them yet. I went bonkers this year. Like, mad scientist took over and I had a kitchen full of treats. Between a full time job that gets busier in December, prepping goodie boxes to be mailed, and being one with the Christmas spirit, there just wasn’t time to post all my favorites. And there were a lot.

But I bring you these: rainbow cookies. If you’re not from the NY Metro area or of Italian or Jewish heritage, you’ve probably never heard of these. Or maybe you have and you are just way ahead of the game. I had never seen these before I started dating a guy of Italian descent who happens to be from Long Island. It’s a double edged sword. My education started with whoopie pies and continued with cupcakes. The WASPiest of treats. But I’m all for trying new things. And this new thing is an awesome thing.
They are small and mini (the best size for treats) and fruity, chocolatey, basically everything dessert should be. They call them cookies, but really it is cake. And I LOVE cake. I put these on my list of holiday baking and decided to give these to Steve’s brother for Christmas. All wrapped up in a pretty box and a shiny bow. Because what is a better gift than perfect treats under the tree?
I knew that tackling these would be quite an event. I researched recipe after recipe and dedicated an entire weekend to perfecting these. And, yes, it took that long to be done with these. I’m a little ADD so focussing on one thing for too long really drives me bananas. I think my brain just stops working, so breaks are essential. I opted to do each time consuming step on a different day and it totally saved me. If I tackle these again — and I obviously will — I will repeat that method. But baking in stages over the holiday? Brilliant idea.
I still have some left over tucked back in the fridge which would be perfect for mixing into some ice cream. And you know my stance on ice cream.
Rainbow Cookies
*Makes about 5 dozen cookies
Ingredients
- 4 large eggs, separated
- 1 cup sugar
- 1 (8-oz) can almond paste
- 2 1/2 sticks (1 1/4 cups) unsalted butter, softened
- 1 teaspoon almond extract
- 2 cups all-purpose flour
- 1/2 teaspoon salt
- 25 drops red food coloring
- 25 drops green food coloring
- 1 (12-oz) jar apricot preserves, heated and strained
- 7 oz fine-quality bittersweet chocolate (not unsweetened), chopped
Directions
- Put oven rack in middle position and pre-heat oven to 350°F. Butter a 13- by 9-inch baking pan and line bottom with wax paper, leaving a 2-inch overhang on 2 ends, then butter paper.
- Beat whites in mixer fitted with whisk attachment at medium-high speed until they just hold stiff peaks. Add 1/4 cup sugar a little at a time, beating at high speed until whites hold stiff, slightly glossy peaks. Transfer to another bowl and set aside
- Switch to paddle attachment for mixer, then beat together almond paste and remaining 3/4 cup sugar until well blended, about 3 minutes. Note: I find it really helpful to chop the almond paste into pieces so it blends easier. I used the kind in the tube and it was the perfect amount.
- Add half the butter and mix well to remove any almond paste lumps. Add remaining butter, and beat about 3 minutes until light and fluffy.
- Add yolks and almond extract and beat until combined well, about 2 minutes.
- Reduce speed to low, then add flour and salt and mix until just combined.
- Fold half of egg white mixture into almond mixture to lighten.
- Then fold in remaining whites gently but thoroughly.
- Divide batter among 3 bowls; I like to use a scale for this to make sure the layers are nice and even.
- Stir red food coloring into one, green food coloring into another, and yellow into the remaining bowl.
- Chill green batter, covered. Spread red batter into prepared pan and spread evenly with offset spatula (layer will be about 1/4 inch thick).
- Bake red layer 8 to 10 minutes, until just set. (It is important to undercook a little.)
- Using paper overhang, transfer layer to a rack to cool, about 15 minutes. Clean pan, then line with wax paper and butter paper in same manner as above. Bake yellow layer in prepared pan until just set. As yellow layer bakes, bring green batter to room temperature. Transfer yellow layer to a rack. Prepare pan as above, then bake green layer in same manner as before. Transfer to a rack to cool. It is important that you do not stack the layers as they are cooling, or when cooled. The layers are very tacky because of the almond paste, so they will stick.
- When all layers are cool, invert green onto a wax-paper-lined large baking sheet. Discard paper from layer and spread with black raspberry preserves. Invert yellow on top of green layer, discarding paper. Spread with apricot preserves. Invert red layer on top of yellow layer and discard wax paper.
- Cover with plastic wrap and weight with a large baking pan; I also like to set a heavy pan on top of the baking sheet or a few cookbooks. Chill at least 8 hours. Note: this is the end of day 1. I decided to chill the layers in the freezer until I assembled them the next day. Lifesaver. Also much easier to work with frozen cake.
- Remove weight and plastic wrap. Bring layers to semi-room temperature.
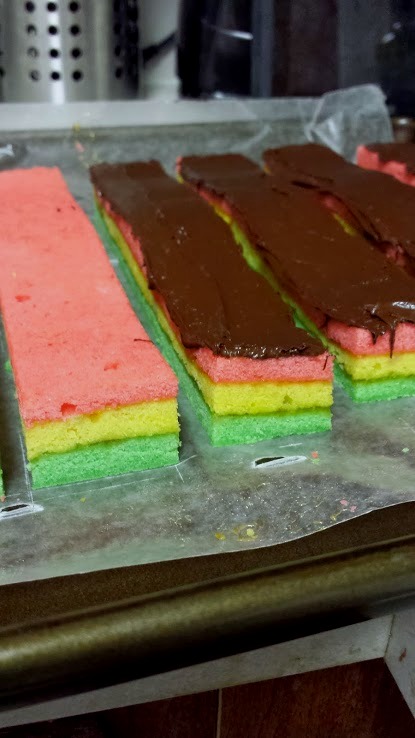
- Trim edges of assembled layers with a long serrated knife, slice assembled layer into thin strips, about 1” thick. Note: this is way way easier when frozen
- Melt half of chocolate in the microwave safe bowl on checking every so often until melted; Quickly spread chocolate in a thin layer on top of each strip. Chill, uncovered, until chocolate is firm, about 15 minutes.
- Melt remaining chocolate and spread over bottom part of cake.
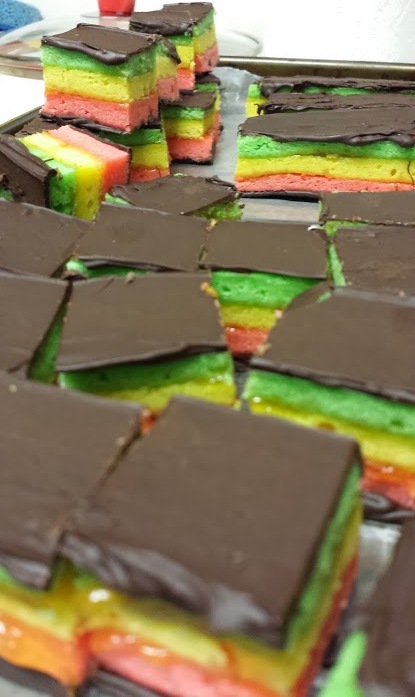
- After 30 minutes. Cut each strip into 1” squares. Note: this is easier right after chocolate has set, any longer and the chocolate will crack as you slice.
- Cookies keep, layered between sheets of wax paper or parchment, in an airtight container at room temperature 2 weeks (or in the freezer forever).

These sound GREAT! Send some to your Dad….